Pages

Showing posts with label Control Panel. Show all posts

Sunday, February 15, 2015

Layout Progress - 15 February 2015

Installed throttle pocket today, added industry labels to three control panel and clean up some.


Sunday, March 9, 2014

Layout Progress - 09 March 2014

Well got some progress done on the layout. Wired up all the tortoise at Bells and finish the panel. Just need to print labels.


Here a few photos of my new laser and some laser cut TT scale ties I have been working on for track and turnouts


Sunday, January 12, 2014

Layout Progress - 07 January 2014

Well not a lot of progress the last few days.

I have been working on Bells control panel wiring and finished it Saturday evening and was to start programming the accessory decoders today. 

I had used some pre-wired LED's from a pass project. I thought, I had tested them correctly, but they were not correct and overheated and melded the styrene panel, so today I spend most of the day redoing the styrene panel, installing new LED and resistors.

As of this evening all is back to where I was Saturday evening and everything is working correct.

More to Come....

Saturday, January 4, 2014

Layout Progress - 04 January 2014

The graphic template for Bells has been done for a couple days , but I did not get around to working on the panel until today.

Holes have been drill and pin-striping tape applied. Installed #6 screws for turnout control (I am short one so a trip to local hardware store tomorrow) and banana plug receptacle for the wand.


Then I move on to starting with the accessory decoders and then some wiring


Another project also has been taking some of my time for last couple of days.
My CNC router been learning software and setup.


Waiting on a new collet with bits and material hold down clamps before I can perform the first cuts

Thursday, January 2, 2014

Layout Progress - 02 January 2014

The new control panel frame is finished. The sealer took longer to dry than plan due to cool/cold and wet weather here in North Texas. I have also mounted it and add the blank styrene front panel.


Next up making the graphic template and laying out the panel for LEDs and switches hole drilling.

Friday, December 27, 2013

Layout Progress - 27 December 2013

This may be my last post (we will see) for 2013.

Last couple of weeks I finished up Bells track wiring.

Today, I start a new control panel for Bell as I did not have another one left over from my past layout.

First photo all components cut


Second photo test assembly


I am going to try and finish the assembly tomorrow before I leave for a steam train ride over at Fort Worth, TX with a buddy. Tickets were a Christmas present from my daughter.


Friday, January 18, 2013

Layout Progress - 13 January 2013

Last couple of days have been working on finishing up the wiring for the Honey Grove panel, just need to decide on names for industries and print them out.


Sunday, January 13, 2013

Layout Progress - 13 January 2013

Today I started on the Honey Grove control panel, so I thought I try to show some step by step progress on how I make my control panels. Note: there are many way to make control panel this is just how I do it.

First up couple of prep photos from the other day


Existing control panel for old layout with front removed


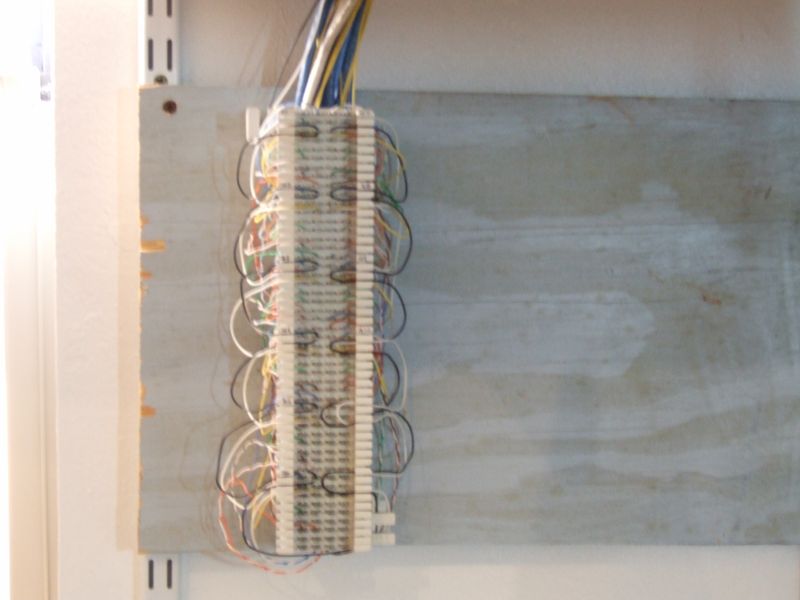
Install a punch down block for switch machine control cable terminations under layout


Let start with a blank piece of .100 inch white styrene, sized for the control panel.


Drill mounting holes and trial fit to assure proper fit.


Attached art work (created in AutoCAD) to the styrene with a glue stick and transfer the hole centers with a punch.
 

After the hole centers are transfer, I draw guidelines using the center points for help when I get to the pinstripe tape step.


Drill all the holes for LED and switch machine control.


Add pinstripe tape (3M 1/16" width), Red for mainline, Blue for sidings.


Front panel mounted back, ready to electronics.


Front panel with LED and switch controls mounted.

I got started with some of the wiring today, more to come.....


Saturday, September 8, 2012

Progress - 08 September 2012

Finish the control panel for Bonham. I do have a bug that comes and goes, I think it is a loose wire but I have yet to find it. Anyway here a photo of the finish panel


I has also been awhile since I shot a over all shot


and here a couple of the yard area


Sunday, August 26, 2012

Progress - 26 August 2012

Due to a family commitment on Saturday, not a lot has been accomplish on the control panel, here what I got done.


Friday evening I found my 3M pinstripe tape and started adding the tape. Sunday I finish up with the striping and added the turntable and roundhouse graphic. Then move on to adding the switches for track power at the roundhouse. Then mounted the panel and added the screws for turnout control, that is all for this weekend.

Wednesday, August 22, 2012

Progress - 22 August 2012

The last week and half, I have been working when I can on the Bonham control panel mostly wiring and troubleshooting. I did manage to short out one of the 556 Driver boards, if I not making mistake then I am not progressing on the layout. Here are the photos


Last Friday evening I made this little board to work with the 556 driver board, it allows a single momentary push button to alternate the direction of a switch machine. The 556 boards require two inputs to change directions. I will be making more of these as this is how I am controlling mainline and industry turnouts


This is where I am with wiring as of yesterday, everything from the panel out to the switch machines is done, all that left to do is the front panel. Tonight I started the front panel.


Printed out the layout.


Started with a clean piece of styrene and transfer the center of the holes with a center punch.


Drew layout lines, basically connect the dots


Drill all the holes for leds, switches and etc. Then proceeded to look for the 3M pinstriping tape but that was a bust. So that is all for this evening.


Sunday, August 12, 2012

Progress - 12 August 2012

This last week I spend time on the control panel for Bonham Yard.


Tuesday the first batch of electronic arrived from Rob Paisley, (7) seven of his 556 Timer Stall-Motor Switch Machine Drivers.


That evening I assembly (4) of the driver boards


Next to arrive was the components for the diode-matrix board on Friday and Saturday and its assembly. I followed plans from Rob site too for the diode-matrix board.


Today was installing and prepping one of the existing control panels from my old  HO layout and the start of installing the new boards. I also cut the new styrene front panel.


Here the latest graphics for the panel layout.

The diode-matrix board controls all but the A/D track turnouts, so I still have to modify the 566 driver boards for those turnouts for the alternating circuit.

I also still got to work out how the roundhouse track power is going to be turned on/off by the toggles switches.

Sunday, November 27, 2011

Back on Track

I had a good thanksgiving week and weekend, got the staging control working and finished installing all mainline track feeders, installed two reversing unit and two more control panel frames.

Now I am able to run a train for the complete layout. Sorry no video as this is something I need to learn how to do (make and post here).

An couple of hours of running show a few problems, but all were easy fixes.

Here is a photo of the working staging control panel


Next up, add mainline and industry turnout control to all installed panels. Clarksville above photo (lower half of panel) is mostly done, need wiring to switch machine and program one accessory decoder.

Staging Control - Finished (almost)

Following David K. Smith circuit (Thanks David), I was able to complete the staging control with one exception. His circuit work great for controlling switch machine and setting the routes, but I had a particular way I wanted the panel lights to work and with some experimenting I thought I had a solution. Upon installing everything and testing the unknown changes for LED's work for all track but one.

I have a solution but I will not be able to make these changes for awhile and will live with the current setup.

Here are the photos of the new power supply and diode matrix board with schematic (schematic shows planned changes)

First - David's power supply


New diode matrix board


Diode-matrix board schematic


Overall staging control Schematic (note track power relay control by a 12VDC wall wart supply)